Master How to Steam Milk at Home at the Perfect Temperature

The secret to nailing café-quality coffee at home isn't just about the beans or the fancy machine; it's getting the milk temperature spot on. For most coffee drinks, you’re aiming for a sweet spot between 60-65°C. At this temperature, the milk becomes perfectly sweet and velvety without a hint of being scalded. It’s this simple detail that lifts a good coffee into a truly great one.
Why Milk Temperature Is Your Secret Weapon
Ever wondered what separates a flat, disappointing homemade latte from the rich, creamy version you get from your favourite coffee shop? Nine times out of ten, the answer is the milk's temperature. It's not just about making the drink hot; it’s a delicate science that completely transforms the milk’s structure and flavour.
When you heat milk, you’re doing two very important things: breaking down its natural lactose sugars and restructuring its proteins. This is where the magic happens. The ideal temperature for steaming milk at home is typically between 60°C and 65°C, a range that baristas and coffee experts swear by.
Hitting this target is crucial. It’s the point where fats and proteins are perfectly activated, creating the smooth, glossy microfoam that's essential for a proper flat white or a beautifully poured latte art heart.
The Science of Sweetness and Texture
Think of cold milk as having a tightly-knit structure. As you introduce steam and nudge it towards that 60-65°C window, the lactose (milk sugar) starts breaking down into simpler, sweeter-tasting sugars. This is exactly why perfectly steamed milk has a natural sweetness that shines through, often meaning you don’t need to add any sugar at all.
At the same time, the milk proteins begin to unwind and trap the tiny air bubbles you're injecting with the steam wand. This process creates that beautiful microfoam—a liquid that’s glossy and velvety, not a stiff, bubbly foam that just sits on top of your drink.
This delicate balance is key, and it’s a principle that applies across the board in coffee making. For instance, understanding the best water temperature for coffee brewing is just as vital for pulling the perfect flavour from your grounds.
If you push the milk past 70°C, you’re in the danger zone. The proteins break down completely, the texture is lost, and you’re left with a flat, thin body and a distinct "burnt" or sulphur-like taste that can ruin a perfectly good espresso shot.
Staying within the correct temperature range ensures you hit that sweet spot of silky texture and natural sweetness every time. To help you get it right, we've put together a quick guide to the ideal temperatures for the most popular coffee drinks.
Ideal Milk Temperatures for Popular Coffee Drinks
Here's a quick-reference guide to the target temperatures for achieving the perfect texture and sweetness for lattes, cappuccinos, and flat whites. Nailing these ranges will make a world of difference to your home barista skills.
| Coffee Drink | Ideal Temperature Range (°C) | Resulting Texture |
|---|---|---|
| Latte | 60-65°C | Silky, smooth microfoam that mixes well with espresso. |
| Cappuccino | 55-60°C | Thicker, more aerated foam that sits distinctly on top. |
| Flat White | 55-60°C | Very thin, velvety layer of microfoam, fully integrated. |
As you can see, even a few degrees can change the game, turning a would-be latte into something closer to a flat white. Getting comfortable with these targets is one of the fastest ways to level up your coffee making.
Equipping Your Home Barista Station
Before you can nail that perfect milk temperature every single time, you need to set yourself up with the right gear. This isn't about splashing out on fancy, complicated gadgets; it’s about choosing tools that give you real control and consistency. The path to silky microfoam starts with a couple of key items that help you feel, measure, and repeat your successes.
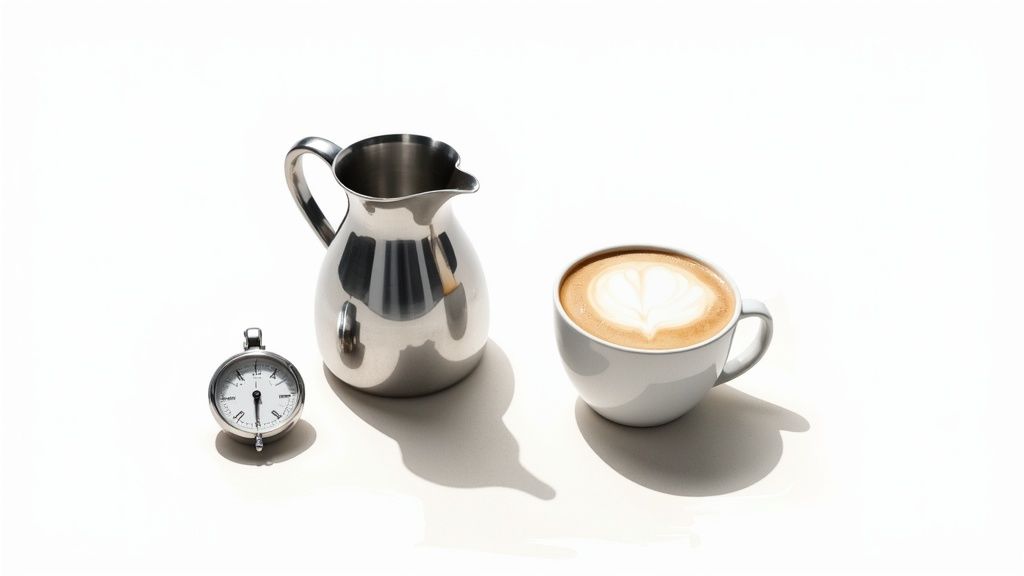
Your most essential piece of kit, aside from the espresso machine itself, is a decent milk jug. A quality stainless steel jug is non-negotiable. Think of it as a direct line of communication between the milk and your hand—as the steam heats the milk, the steel transfers that heat, letting you physically feel the temperature climb.
For instance, the jugs from ADS Coffee Supplies are designed precisely for this kind of tactile feedback. This hands-on method helps you build an instinct for when the milk is hitting that 60-65°C sweet spot, often before a thermometer even confirms it. Of course, having a machine that delivers consistent steam is just as important. If you're weighing up your options, understanding the differences between an espresso machine vs a bean-to-cup model is a great place to start.
Choosing Your Thermometer
While learning to go by feel is a fantastic skill, a reliable thermometer is your secret weapon for precision. It cuts out the guesswork entirely and makes sure you hit the exact temperature for your drink, time after time. You’ve mainly got two types to consider.
- Clip-on Analogue Thermometers: These are the classic choice, with a dial face and a clip that hooks right onto your jug. They're straightforward, battery-free, and give you a clear visual as the needle moves up.
- Digital Thermometers: For pinpoint accuracy, digital is the way to go. You get a precise number, often down to a decimal point. They’re fast, accurate, and some even have alarms you can set to go off when your milk is ready.
A tool like the Core Milk Thermometer is a great middle-ground, with an easy-to-read display and a dependable clip. What you choose is really down to personal preference, but using a thermometer is the single best way to stamp out inconsistency.
The real goal here is to build muscle memory. Start by using a thermometer to train your senses. Soon enough, you’ll find yourself stopping the steam at just the right moment out of habit, using the thermometer simply to confirm what your hand already knows. That blend of technology and touch is what will truly elevate your home coffee game.
The Art of Steaming Perfect Microfoam
Alright, let's move from theory to the hands-on skill of steaming milk. Getting that perfect, glossy microfoam is really a two-part dance: first stretching the milk to add air, and then texturing it to create that silky, integrated feel. Nailing this process is what elevates a decent home coffee to something truly special, giving you that velvety mouthfeel you’d expect from a top-notch café.
The first part, stretching, is all about introducing air. You’ll want to place the tip of your steam wand just below the surface of the milk. Listen closely – you're aiming for a gentle, consistent 'tsss-tsss-tsss' sound. That's the sweet spot, the sound of air being incorporated just right. If you get a loud, screeching noise, the wand's too deep. Seeing big, soapy bubbles? It's too shallow.
Creating the Perfect Whirlpool
Once the milk's volume has increased by about 20-30%, it's time to switch gears to texturing. This is where you create a whirlpool. Dip the steam wand a bit deeper and angle it slightly off-centre in the jug. This gets the milk spinning, folding all those tiny air bubbles you just created right back into the liquid.
This spinning motion is absolutely crucial. It breaks down any larger bubbles and blends the air evenly throughout the milk, resulting in a uniform, silky texture instead of that stiff, separate foam that just sits on top of your coffee. You'll actually see the milk transform before your eyes, taking on a beautiful sheen like wet paint. Keep this vortex going until the side of the jug becomes too hot to comfortably hold.
This simple process visualises the key stages: preparing your jug, measuring the temperature rise, and aiming for that perfect final cup.

The journey from cold milk to silky microfoam relies on these distinct yet connected steps, turning a technical process into a repeatable habit.
Knowing When to Stop
Knowing the exact moment to shut off the steam is probably the single most important part of this whole process. With more and more people becoming skilled home baristas, there's a huge interest in the science behind perfect milk temperature. The sweet spot is widely agreed to be between 60°C and 65°C. This range brings out the milk's natural sweetness and creates that creamy, velvety texture you need for lattes and cappuccinos.
A thermometer is your best friend here, but you should also train your senses. The side of the jug will feel hot, but not so hot that it burns you instantly. A good rule of thumb I've always used is to stop when it's just a bit too hot to keep your hand pressed against it for more than a second.
After you've finished steaming, give the jug a firm tap on the counter to knock out any lingering large bubbles. Then, gently swirl the milk to keep it perfectly integrated and glossy. This final polish is essential before you pour, especially if you're hoping to try your hand at some latte art.
Getting this right takes a bit of practice, but it's such a rewarding skill to have. For anyone wanting to take their pouring to the next level, our guide to latte art basics at home is the perfect next step. To truly master the art of steaming and create perfect microfoam, consider honing your skills further through dedicated instruction, such as those found in the best cooking classes online.
How Different Milks Behave Under Heat

Choosing your milk isn't as simple as it used to be. A decade ago, it was just a choice between skimmed or whole. Now, the move from dairy to a plant-based alternative like oat or almond is about more than just taste; it completely changes the game when you introduce a steam wand.
You can't treat all milks the same. The unique blend of proteins, fats, and sugars in each type dictates how well it traps air and holds its structure under heat. Getting your head around these differences is the secret to pouring silky, consistent microfoam, no matter what’s in your jug.
The Forgiving Nature of Whole Dairy Milk
If you’re just starting to steam milk at home, temperatures and technique are easiest to nail with whole dairy milk. Its perfect balance of fat and protein makes it incredibly forgiving to work with. The fat gives you that rich, creamy texture, while the proteins create a stable, glossy microfoam that holds its shape beautifully for latte art.
You can confidently aim for that 60-65°C sweet spot when steaming whole milk. It has a robust structure that won't break down too quickly, giving you a wider margin for error while you're still learning. It's the gold standard in most cafés for a reason and makes the perfect training ground for any home barista.
Navigating Plant-Based Alternatives
The world of plant-based milks offers an incredible range of flavours, but they each come with their own set of rules for steaming. Because they have lower protein levels and different fat structures, they can be much less stable when you heat them.
- Oat Milk: This is often the closest plant-based option to dairy in terms of performance. Its naturally creamy texture and higher carbohydrate content help create a surprisingly good foam. Be careful though, as it can curdle if you heat it too aggressively. Aim for a slightly lower temperature, around 55-60°C, to keep it smooth.
- Soya Milk: A classic alternative, soya is high in protein, which helps it create a thick, dense foam. The trick here is to introduce a little less air than you would with dairy milk to avoid a stiff, bubbly texture. Just like oat milk, keeping it under 60°C prevents it from taking on a slightly cardboard-like flavour.
- Almond Milk: This one can be tricky. Its low protein and fat content mean it often produces a thin foam that disappears quickly. The key is to use minimal aeration and a very gentle heating process to get the best results.
For the best results with any plant-based milk, always look for the 'barista edition'. These blends are specifically formulated with added emulsifiers and stabilisers that help them behave more like dairy milk under steam, giving you a much better chance at creating lasting, pourable microfoam.
To help you get the best results, here’s a quick guide to how different milks perform under the steam wand.
Steaming Guide For Dairy And Plant-Based Milks
| Milk Type | Steaming Difficulty | Optimal Temperature (°C) | Foam Quality & Stability |
|---|---|---|---|
| Whole Dairy | Easy | 60-65 | Excellent; stable & glossy |
| Oat Milk | Medium | 55-60 | Good; creamy but can curdle |
| Soya Milk | Medium | <60 | Good; can be thick & dense |
| Almond Milk | Hard | <55 | Poor; thin & dissipates fast |
Remember that barista-specific versions of plant milks will almost always perform better than their standard counterparts, so they're well worth seeking out.
If you’re just getting started and want to build a solid foundation, our guide on how to make a latte is a great place to begin. It walks you through the basics with dairy milk before you start experimenting with alternatives.
Troubleshooting Common Steaming Mistakes
Even the most seasoned baristas had to start somewhere, and learning to steam milk at home definitely comes with a few mishaps. Instead of getting frustrated when your milk looks more like a bubble bath than velvety microfoam, let’s diagnose and fix the most common issues.
One of the most frequent problems I see is milk with large, soapy bubbles. This is almost always a sign of over-aeration, which happens when the steam wand tip sits too close to the milk's surface for too long. You're essentially just injecting a load of air without giving it a chance to properly mix and break down.
The fix is surprisingly simple: just shorten the aeration phase. Listen for that gentle hissing sound for only a few seconds at the very start—just enough to see the milk expand slightly. After that, plunge the wand deeper to create that crucial whirlpool, which will break down any big bubbles and texturise the milk into a silky microfoam.
Scalded Milk and Poor Texture
Another common hurdle is scalded milk. You'll know it by its flat, slightly burnt taste and disappointingly thin texture. This happens when you overheat the milk, which completely destroys the proteins that give it body and sweetness. The sweet spot you're aiming for is between 60°C and 65°C—the ideal range for both flavour and texture.
To avoid this, keep a close eye on your thermometer and a hand on the side of your jug. Stop steaming the moment you hit that 65°C mark. If you’re going by touch, kill the steam as soon as the jug becomes too hot to comfortably hold for more than a second.
Remember, you can't save scalded milk. Once the proteins are broken down, they're gone for good. Always pour it out and start again with fresh, cold milk. It might feel wasteful, but it's the only way to get the quality you’re aiming for.
The Importance of a Clean Machine
Finally, if your results are inconsistent or the milk tastes a little off, the culprit might be your machine. Old milk residue can build up inside the steam wand, which messes with steam pressure and introduces some pretty unpleasant flavours into your fresh milk.
A clean machine is non-negotiable for great-tasting coffee.
- Wipe: Always give the steam wand a good wipe with a damp cloth immediately after you've used it.
- Purge: Blast the wand for a couple of seconds to clear out any milk residue from inside.
- Deep Clean: Regularly give your equipment a proper clean to keep everything in top condition.
Keeping your equipment pristine is just as important as your technique. Consistent cleaning prevents blockages and ensures every coffee you make tastes fresh and delicious. For a deeper dive into maintenance, you can also check out our guide on descaling your coffee machine.
Got Questions About Steaming Milk? Let’s Clear Things Up.
As you start to get the hang of things, a few common questions always seem to surface. Think of this section as your quick-fire troubleshooting guide, designed to help you iron out the kinks and get that perfectly steamed milk at home temperature every single time.
Can I Resteam Milk That Has Already Been Heated?
Honestly, it’s best to avoid this completely. When you steam milk the first time, you’re changing its protein structure to create that lovely, silky microfoam. Heating it a second time just breaks those proteins down further, leaving you with a flat, lifeless texture and a slightly burnt, disappointing flavour.
For the sweetest taste and best possible foam, always start with fresh, cold milk straight from the fridge. It makes all the difference.
Why Is My Plant-Based Milk Not Frothing Well?
Ah, the classic struggle. This is something almost everyone runs into because plant-based milks have a totally different makeup of proteins and fats compared to dairy. They just aren't naturally built to trap air in the same stable way.
If you're finding it impossible to get a decent foam, the simplest fix is to switch to a 'barista edition' of your favourite plant-based milk. These are specifically formulated with added fats or stabilisers that help them create a much more stable and pourable microfoam.
One of the biggest lessons for any home barista is the importance of consistency. Getting the right tools and starting with the right ingredients—whether that's fresh dairy or a barista-blend oat milk—sets you up for success before you even turn the steam wand on.
Does the Size of My Milk Jug Matter?
Yes, it absolutely does. The size of your jug is surprisingly crucial for creating that whirlpool effect you need for silky microfoam. If your jug is too small, the milk has nowhere to expand, and you’ll just make a mess without texturing it properly. On the other hand, if it's too big for the amount of milk you're using, you'll struggle to get the steam wand deep enough to do its job.
A good rule of thumb is to fill your jug to just below where the spout begins. This is usually about one-third to half full, which gives the milk enough room to roughly double in volume as it steams. For home setups, a quality stainless steel pitcher like the ones from ADS Coffee Supplies gives you the perfect balance of size and heat conductivity.
How Do I Clean the Steam Wand Properly?
Proper cleaning is non-negotiable, both for hygiene and for the performance of your machine. A dirty wand can get blocked in a heartbeat and will introduce some pretty unpleasant, stale flavours into your fresh milk.
Get into the habit of following this simple two-step process immediately after every single use:
- Wipe it down: Keep a dedicated, damp cloth handy and wipe away all the visible milk residue from the outside of the wand. Don't wait!
- Purge it out: Point the wand towards the drip tray and blast the steam for a couple of seconds. This quick purge clears out any milk that might have been sucked up inside the tip.
Here at ADS Coffee Supplies, we know that making café-quality coffee at home is all about mastering the little details. From hitting the perfect temperature to having the right gear, we're here to help you on your journey. Feel free to explore our full range of barista tools and cleaning supplies to take your daily brew to the next level.