How to Make a Flat White Like a Pro Barista

Making a flat white is all about mastering the balance between a strong espresso base and a thin, velvety layer of steamed milk. The goal is a coffee-forward drink where the milk’s silky texture complements, rather than overpowers, the rich flavour of the beans.
What Makes a Flat White So Special
Before you start pulling shots and steaming milk, it’s worth understanding what truly defines a flat white. Unlike its frothier cousins, the latte and cappuccino, a flat white is a study in texture and intensity. Its whole identity is built on that precise partnership between robust coffee and perfectly prepared milk.
This popular drink traces its roots back to Oceania in the 1980s, with both Australia and New Zealand laying claim to its creation. From those vibrant speciality coffee scenes, it travelled to the UK and quickly became a café staple. Its appeal lies in its specific construction, which puts the coffee front and centre.
The Core Elements
The magic of a flat white really comes down to two key components:
- A Robust Espresso Base: This is often made with a double ristretto shot—a shorter, more concentrated pull. The result is an intense, sweet, and almost syrupy coffee base that provides the strong foundation a flat white is known for.
- Velvety Microfoam: The milk is steamed to create a glossy, wet-paint-like texture with tiny, uniform bubbles. This microfoam is then integrated throughout the espresso, creating a smooth, consistent mouthfeel from the first sip to the last.
The key is that thin layer of microfoam. While a cappuccino has a thick, airy foam cap and a latte has more steamed milk, the flat white maintains a much closer coffee-to-milk ratio, allowing the espresso’s character to really shine through.
Why It Became a UK Favourite
The flat white’s rise in the UK mirrors a wider shift towards more sophisticated coffee tastes. It’s no longer a niche order; flat whites now account for approximately 32% of UK coffee orders, making it a top-three choice alongside lattes and filter coffee.
This surge reflects a culture where 80% of Brits visit a coffee shop weekly, seeking quality beverages that deliver on flavour. You can explore the data on UK coffee habits and consumer preferences in more detail to see just how ingrained this drink has become.
This appreciation for expertly crafted drinks goes far beyond just the flat white. To get a better feel for how different preparation styles impact flavour, you might be interested in our guide on the best coffee brewing methods. Learning about these techniques helps you appreciate the craft behind every single cup.
Your Home Barista Toolkit and Ingredients

Crafting a café-quality flat white at home really begins before you even think about pulling a shot. It all starts with getting the right tools and the best possible ingredients lined up. Putting together your home barista setup is the first real step towards nailing this classic drink and getting that rich, velvety flavour you’re after.
The absolute cornerstone of any great flat white is a capable espresso machine with a proper steam wand. This is the one piece of kit you just can't compromise on. While other gadgets can make strong coffee, only a true espresso machine delivers that essential, crema-topped shot that forms the drink’s foundation. Just as crucial is a high-quality burr grinder. Pre-ground coffee goes stale incredibly quickly, losing its delicate aromas and flavours within minutes of being opened. Grinding your beans fresh, right before you brew, makes a world of difference.
Choosing Your Coffee Beans
The beans you pick will define the final taste of your flat white more than anything else. For that classic, comforting flavour, I’d suggest starting with a medium-to-dark roast. These roasts typically bring out notes of chocolate, caramel, and nuts, which taste absolutely beautiful when paired with steamed milk. A lighter, more acidic single-origin bean can sometimes get a bit lost or even clash with the milk’s natural sweetness.
Of course, half the fun is exploring different origins and roast levels to see what you like. If you're ready to dive in, have a look at the world of speciality coffee beans to find a flavour profile that really speaks to you.
Barista Tip: Always, always use freshly roasted beans. Check for a "roasted on" date on the bag. For the best flavour, you'll want to use them within one to four weeks of that date.
This focus on top-notch ingredients isn't just a niche obsession; it’s part of a much bigger picture. The flat white's popularity in the UK has grown alongside a huge appreciation for speciality coffee, as more of us look for better experiences, whether we're in a café or making coffee at home. Brits now drink around 98 million cups of coffee per day, and a huge number of those are high-quality, espresso-based drinks like the flat white. It shows how much our coffee culture has deepened, where sourcing and preparation are now just as important as the final sip itself.
The Right Milk for Silky Microfoam
When it comes to the milk, fat content is your secret weapon. Whole milk is the gold standard for creating that silky, glossy microfoam. Its perfect balance of fats, proteins, and sugars creates the most stable and creamy texture when steamed, making it incredibly forgiving for beginners and delivering consistently brilliant results.
That said, you can still get impressive results with alternatives.
- Oat Milk: A good barista-grade oat milk is a fantastic plant-based choice. It steams beautifully and creates a texture that comes surprisingly close to dairy.
- Almond Milk: This one can be a bit trickier. It’s prone to separating if you’re not careful, so make sure you use a barista-specific version and don't overheat it.
No matter which milk you choose, the key is to start with it cold—straight from the fridge. Cold milk gives you a longer window to introduce air and work on creating that perfect velvety texture before it gets too hot.
Pulling the Perfect Espresso Shot

Let's be clear: the very soul of a brilliant flat white is a flawless espresso shot. This isn't just one step in the process; it's the entire foundation. A rich, syrupy, and perfectly balanced shot is what provides that intense coffee flavour that makes this drink so special. Without it, you just have hot, milky water.
Achieving this all starts with ‘dialling in’ your grind. The fineness of your coffee grounds is the main dial you'll turn to control how quickly water flows through them, which in turn dictates the extraction. For espresso, you’re aiming for a consistency somewhere around granulated sugar—not as coarse as sand, but definitely not as fine as powder.
It's a delicate dance between grind size and time. Pull a shot too quickly, and it'll taste sour and disappointingly weak. Too slow, and you'll get a bitter, harsh mouthful. A great starting point is to aim for a double shot (around 30-40ml) to pour in about 25-30 seconds.
Dialling In Your Grind and Tamp
Once you've got your grinder dialled in, the next crucial move is tamping. This is where you compress the coffee grounds in the portafilter to create a level, uniformly dense 'puck'. The goal here is simple: consistency. You want to apply firm, even pressure to ensure water flows through all the coffee evenly, rather than finding a shortcut.
Think of it like this: your coffee puck is a barrier. If it has cracks or is sloped to one side, the pressurised water will just blast through the path of least resistance. This is called 'channelling', and it leads to a poorly extracted, unbalanced shot. Getting your tamping pressure consistent is one of the most important skills you can develop.
For a much deeper dive into mastering the nuances of extraction at home, check out our detailed instructions on how to make espresso at home. That guide breaks the entire process down into easy-to-follow steps.
Recognising a Great Extraction
You’ll know you’ve nailed it when you see the visual cues of a perfect shot. As the espresso begins to drip from the spouts, it should quickly come together into a stream that looks thick and syrupy, almost like warm honey. Baristas often call this a ‘mouse tail’ because of its thin, continuous, and slightly curved flow.
The most obvious sign of a well-pulled shot is the crema—that beautiful reddish-brown, frothy layer that sits on top. A stable, hazelnut-coloured crema tells you the roast is fresh and the extraction was well-balanced. It traps all those aromatic oils, adding to the shot’s flavour and mouthfeel.
This move towards perfectly crafted espresso is a massive part of why the flat white exploded in popularity across the UK. For decades, British coffee culture was dominated by instant coffee, but the rise of speciality coffee shops created a huge demand for expertly made drinks. In fact, the UK's coffee shop sector has seen such huge growth that out-of-home purchases are projected to reach 34.5 million kilograms by 2028, a trend largely driven by our love for quality espresso.
How to Steam Velvety Microfoam
If espresso is the heart of a flat white, then the milk is its soul. This is where the real magic happens, transforming a simple ingredient into that signature, silky microfoam. Honestly, it’s a skill that separates a good flat white from a truly great one, and it’s a world away from the stiff, bubbly foam you’d find piled on a cappuccino.
The whole process comes down to two distinct but connected phases. First, there’s ‘stretching’, which is the careful introduction of air into the milk. This is immediately followed by ‘texturing’, where you create a vortex to fold that air in, breaking down any large bubbles and creating a uniform, glossy liquid.
Getting this right feels like a genuine barista achievement. It’s less about brute force and more about a delicate touch—and learning to listen for the right sounds.
This process flow diagram breaks down the ideal parameters for your espresso shot, which you'll want to have ready before you even think about steaming.
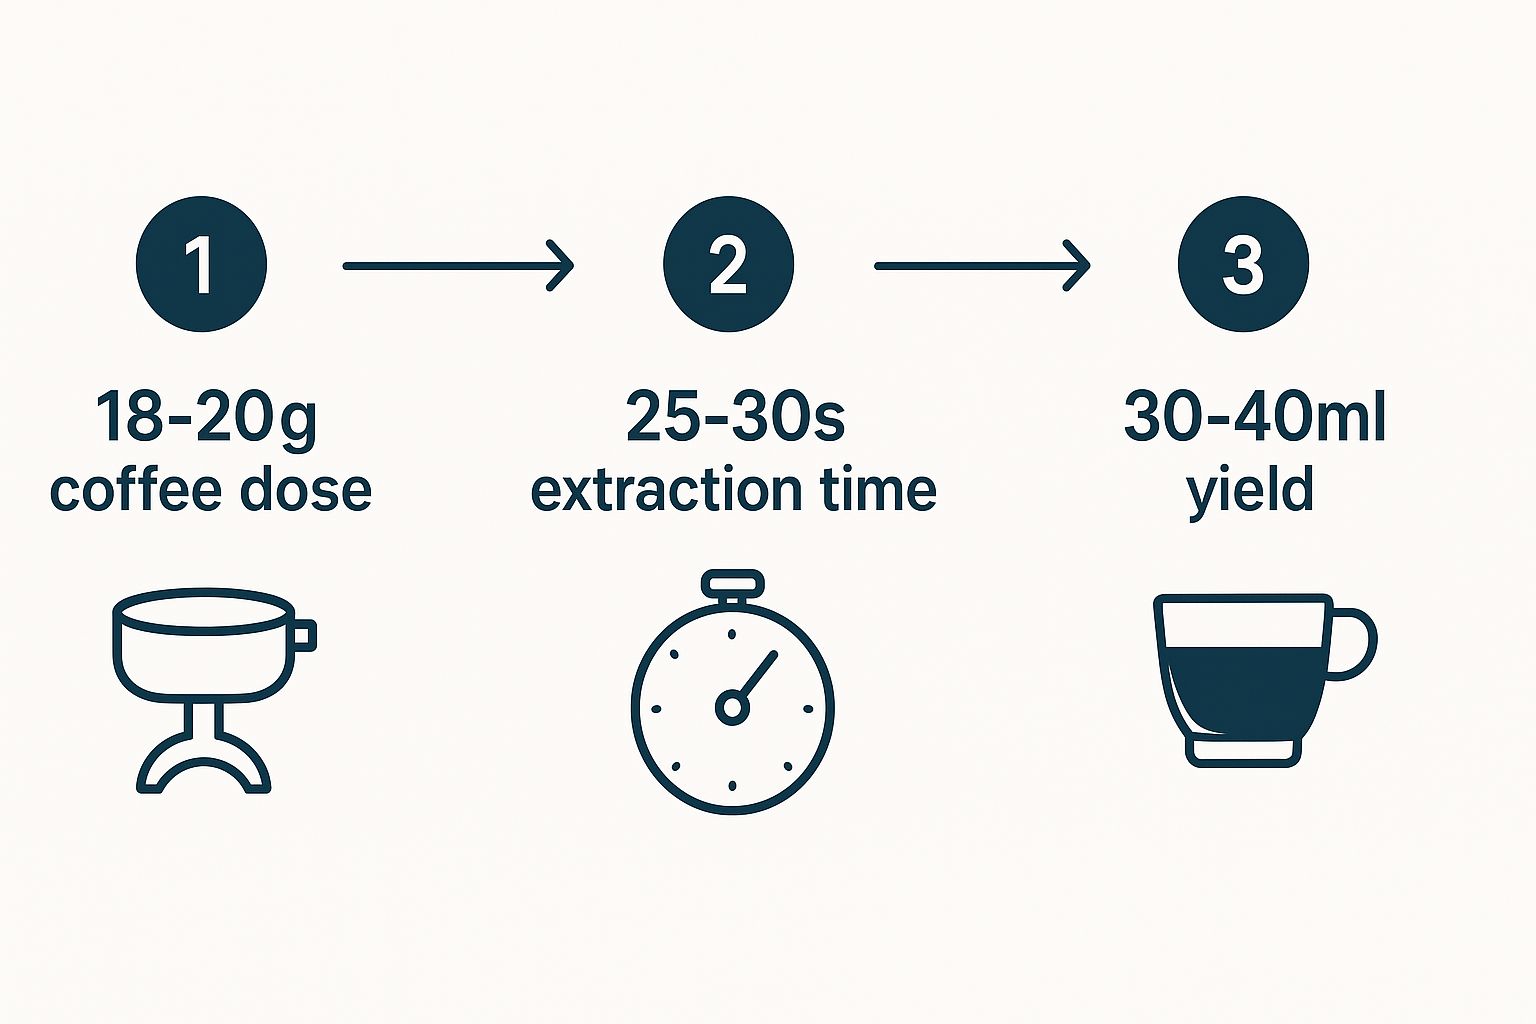
Hitting these targets for dose, time, and yield ensures your coffee base is strong and balanced enough to hold its own against the rich, sweet milk you're about to add.
The Stretching Phase: Aerating the Milk
Always start with cold milk in a cold jug. Seriously, this makes a huge difference. The key from the very beginning is getting the steam wand in just the right spot. Submerge the tip just below the surface of the milk, positioning it slightly off-centre. This specific placement is crucial for what’s about to happen.
When you turn on the steam, you’re listening for a gentle, consistent ‘hissing’ or tearing sound. That's the sound of air being pulled into the milk. You only want to do this for a few seconds—just long enough for the milk to expand by about 20-30%. If you hear a loud, screeching noise, the wand is too deep. If you see big, ugly bubbles forming, it’s too close to the surface.
Pro Tip: Keep one hand on the side of the milk jug. This isn’t for show; it’s your thermometer. As soon as the jug starts to feel warm to the touch (around body temperature), you’ve stretched it enough. Time to move on.
The Texturing Phase: Creating the Vortex
Once you've added that small amount of air, it’s time to create that silky, polished texture. Dip the steam wand a bit deeper into the milk, still keeping it slightly off-centre. The goal now is to get a proper whirlpool going.
This vortex motion folds those tiny air bubbles you created back into the body of the milk. It breaks down any larger bubbles and emulsifies everything, polishing it into a smooth, glossy liquid with the consistency of wet paint. You shouldn't see any bubbles at all.
Keep this vortex spinning until the jug becomes too hot to comfortably hold for more than a second or two. This usually means you’ve hit the sweet spot of around 60-65°C. If you go any hotter, you’ll scorch the milk, killing its natural sweetness and leaving it with a flat, burnt taste. Remember to turn off the steam wand before pulling it out of the jug to avoid making last-minute bubbles.
Here are a few common mistakes to watch out for at this crucial stage:
- Creating Bubbly Foam: This usually happens if you keep the steam wand too close to the surface for too long during the stretching phase. You'll end up with a stiff, airy foam instead of that beautifully integrated microfoam.
- Not Creating Enough Texture: If you plunge the wand in too deep from the start, you won't incorporate enough air. You’ll just have hot milk with no body, which won't pour properly for latte art.
- Overheating the Milk: Steaming past 70°C is the fastest way to ruin your drink. It denatures the milk proteins and caramelises the sugars in a very unpleasant way.
After steaming, give the jug a firm tap on the counter to pop any lingering surface bubbles. Then, swirl the milk gently in the jug. This keeps it glossy and perfectly integrated while you get ready to pour, and it's a vital step for a smooth, beautiful finish.
Pouring and Presenting Your Flat white

This is the moment of truth. You’ve pulled a beautiful shot of espresso and steamed your milk to perfection; now it’s time to bring them together. The pour isn’t just about mixing liquids—it’s an art that fuses the espresso and microfoam into a single, seamless drink. Get this right, and you'll have a flat white that genuinely rivals your favourite coffee shop.
Before you even tip that jug, a little prep work is essential. Give your steamed milk a confident swirl. This polishes the milk, folding the microfoam back into the liquid to keep that glossy, wet-paint texture. Don't let it sit! At the same time, give the espresso in your cup a gentle swirl to even out the crema.
The Perfect Pouring Technique
Great pouring comes down to two things: height and speed.
Start by holding the milk jug high above the cup, maybe 10-15cm up. Pour a thin, steady stream right into the centre of the espresso. Pouring from a height like this lets the milk dive under the crema, mixing with the espresso below without washing out that gorgeous caramel-coloured top.
Once the cup is about half to two-thirds full, it's time to get closer. Drop the jug's spout right down near the surface of the coffee and speed up your pour just a little. This change is what lets the white microfoam float on top, creating the contrast you need for latte art.
Remember, practice makes perfect. Your first few pours might not look like much, but don’t worry about it. Just focus on a steady hand and a smooth, continuous motion. Even a messy flat white tastes incredible if the coffee and milk are on point.
Creating a Simple Latte Art Heart
Feeling ambitious? The heart is the classic starting point for any budding home barista, and it’s easier than it looks. Once you’ve lowered the jug and started pouring close to the surface, you’ll see a white dot form.
- Keep Pouring: Hold your position and keep pouring into the middle of that dot, allowing it to grow into a bigger circle.
- Lift and Strike Through: When the cup is nearly full, lift the jug slightly and pull the stream of milk straight through the centre of the circle to the other side.
That final "strike-through" motion is what pulls the circle into a heart. It’s a simple move, but incredibly satisfying.
Finally, serve it right. A proper flat white belongs in a 150-180ml ceramic cup. The smaller size is non-negotiable; it maintains that crucial coffee-to-milk ratio, ensuring the espresso flavour punches through. It’s the final touch that makes the whole experience authentic.
Common Flat White Questions Answered
Even after you feel you've nailed the basics, a few questions always seem to pop up. It's completely normal. This final section is dedicated to tackling those common queries, helping you troubleshoot any lingering issues on your home barista journey.
Getting the hang of a flat white means understanding what makes it different from its closest coffee shop relatives. Once you get this, everything else clicks into place.
The real secret lies in two things: the texture of the milk and the coffee-to-milk ratio. A flat white uses a thin, silky layer of microfoam that integrates perfectly with the espresso. A latte, on the other hand, has a much thicker, distinct blob of foam sitting on top. This subtle change creates a completely different drink.
This focus on texture, usually combined with a stronger coffee base like a double ristretto shot, gives you a much more intense coffee flavour that lets the quality of your beans really shine.
What Is the Real Difference Between a Flat White and a Latte?
The main distinction is all about the milk texture and the balance of coffee to milk. A proper flat white has that thin layer of velvety microfoam poured over a strong espresso base, which is why it packs such a coffee-forward punch.
A latte, in contrast, is a much milkier, milder drink. It contains more steamed milk and is topped with a thicker, stiffer layer of foam.
To keep that perfect, coffee-forward balance, flat whites are traditionally served in smaller cups—typically 150-180ml. This stops the espresso from being drowned out and lost in a sea of milk.
Why Does My Flat White Taste Weak?
This is a classic problem, and it nearly always comes down to one of two things: a poorly pulled espresso shot or the wrong coffee-to-milk ratio.
First, check your espresso. If the shot is under-extracted—tasting sour or watery—it will completely disappear once you add milk. Using a double ristretto is the best way to get that robust flavour needed to cut through the richness of the milk.
Second, look at your cup size. A traditional flat white is made for a 5-6oz cup. If you're using a bigger mug, you’re just diluting the coffee and turning it into a weak, milky drink rather than the punchy, satisfying beverage it’s meant to be.
Can I Make a Good Flat White Without an Espresso Machine?
While an espresso machine with a proper steam wand is definitely the ideal tool for the job, you can still create a pretty satisfying version without one.
For a strong coffee base, you can use a Moka pot or an AeroPress to produce a concentrated, espresso-like shot. We dive into these methods in more detail in our complete guide on how to brew coffee.
As for the milk, gently heat it on the hob or in the microwave. Then, use a handheld frother or even a French press (by plunging it up and down repeatedly) to create a similar texture. It won’t be identical to professionally steamed microfoam, but with a bit of practice, you can get a surprisingly delicious result right at home.
Ready to brew your perfect flat white? It all starts with the best beans. At Seven Sisters Coffee Co, we source and roast exceptional coffee to bring café-quality flavour straight to your kitchen. Explore our collection and find your new favourite.