A Guide to Ground Coffee for Cafetieres in the UK
If you want the best ground coffee for a cafetiere, the secret is a coarse, even grind. Think of the texture of coarse sea salt. This specific grind size is absolutely crucial because it stops tiny coffee particles from slipping through the mesh filter, giving you a clean, full-bodied cup without the sludge or bitterness that finer grounds always leave behind.
Your Journey to the Perfect Cafetiere Brew
Welcome to your complete guide for mastering one of the most beloved ways to brew coffee at home. The cafetiere, often called a French press, is celebrated by coffee lovers across the UK for its ability to produce a uniquely rich and aromatic cup. Its simple immersion method lets the coffee grounds and hot water mingle freely, extracting a depth of flavour that other brewers just can't replicate. But unlocking this potential doesn't come down to a complex technique; it all starts with one fundamental choice: selecting the right ground coffee.
This guide is for anyone looking to turn their daily coffee from a simple habit into a true craft. We’ll walk through every aspect of choosing the perfect ground coffee for your cafetiere, making the process clear and straightforward.
What You Will Learn
This journey will cover all the essentials, making sure you have the confidence to brew a flawless cup, every single time. We will explore:
- The crucial role of grind size and why consistency is everything.
- How roast levels affect flavour, from bright and fruity to dark and chocolatey.
- A step-by-step brewing guide with the ideal coffee-to-water ratios.
- Troubleshooting common issues like bitter or weak coffee.
The consistency of your coffee grounds is paramount. While pre-ground coffee offers convenience, grinding your own beans just before you brew delivers an unparalleled freshness and control. The type of grinder you use—whether it’s a conical or flat burr model—massively impacts the uniformity of the grind. You can dive deeper into the differences in our detailed guide on conical vs flat burr grinders.
At ADS Coffee Supplies, we see ourselves as your partners on this journey. Our commitment to quality, freshness, and sustainably sourced coffee is at the heart of everything we do. We promise a clear path to understanding coffee selection and brewing, helping you avoid common pitfalls and get straight to the good stuff.
Why Grind Size Is Everything for Your Cafetiere
Of all the things that can make or break your morning brew, nothing is more important than the grind size. It's the absolute foundation of a good cafetiere coffee.
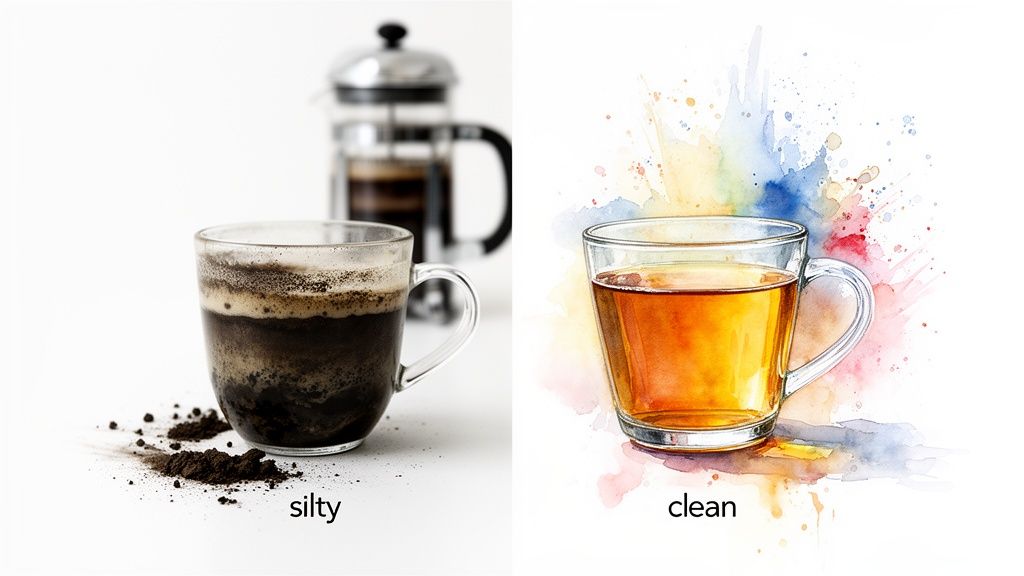
Picture this: you're trying to catch pebbles with a fishing net. Some will stay, but the small ones will slip right through. That’s exactly what happens when you use finely ground coffee in a cafetiere. You end up with a sludgy, silty cup that completely masks the beautiful flavours you were hoping for.
Nailing this one concept is the first big leap towards mastering your brew. For a cafetiere, you need a coarse, consistent grind that works in perfect harmony with its simple metal mesh filter.
The Science of Extraction and Flavour
Making coffee is just a science experiment in your kitchen. It's all about extraction—pulling the delicious flavour compounds out of the coffee grounds and into the hot water. The size of those grounds is what controls how fast this happens.
- Fine Grounds: These are tiny particles with a huge surface area, which means they give up their flavour incredibly quickly. In a cafetiere, this leads to over-extraction, releasing all the bitter, harsh notes. They also sneak through the filter, leaving you with that dreaded muddy texture.
- Coarse Grounds: With less surface area, these larger particles allow for a much slower, more controlled extraction over the usual four-minute brew time. This is the sweet spot for a balanced, full-bodied cup that’s clean on the palate.
- Inconsistent Grounds: A mix of fine and coarse bits is the worst of both worlds. The tiny particles over-extract and turn bitter, while the big chunks under-extract and taste sour. The result? A confusing and deeply unsatisfying brew.
Getting the grind right has become more important than ever. With the UK's home coffee market booming, ground coffee for cafetieres is now the second-most popular format after instant. As households spend an average of £6.42 per week on their coffee habit, and with a huge 58.1% of people trying to recreate that coffee shop magic at home, perfecting the grind is non-negotiable.
Identifying the Perfect Grind
So, what does the ideal cafetiere grind actually look like? Think coarse sea salt or chunky breadcrumbs. You should be able to see distinct, uniform particles, with almost no fine, powdery dust in the mix.
This chart breaks down the key pillars of a perfect brew, and it all starts with that all-important grind.
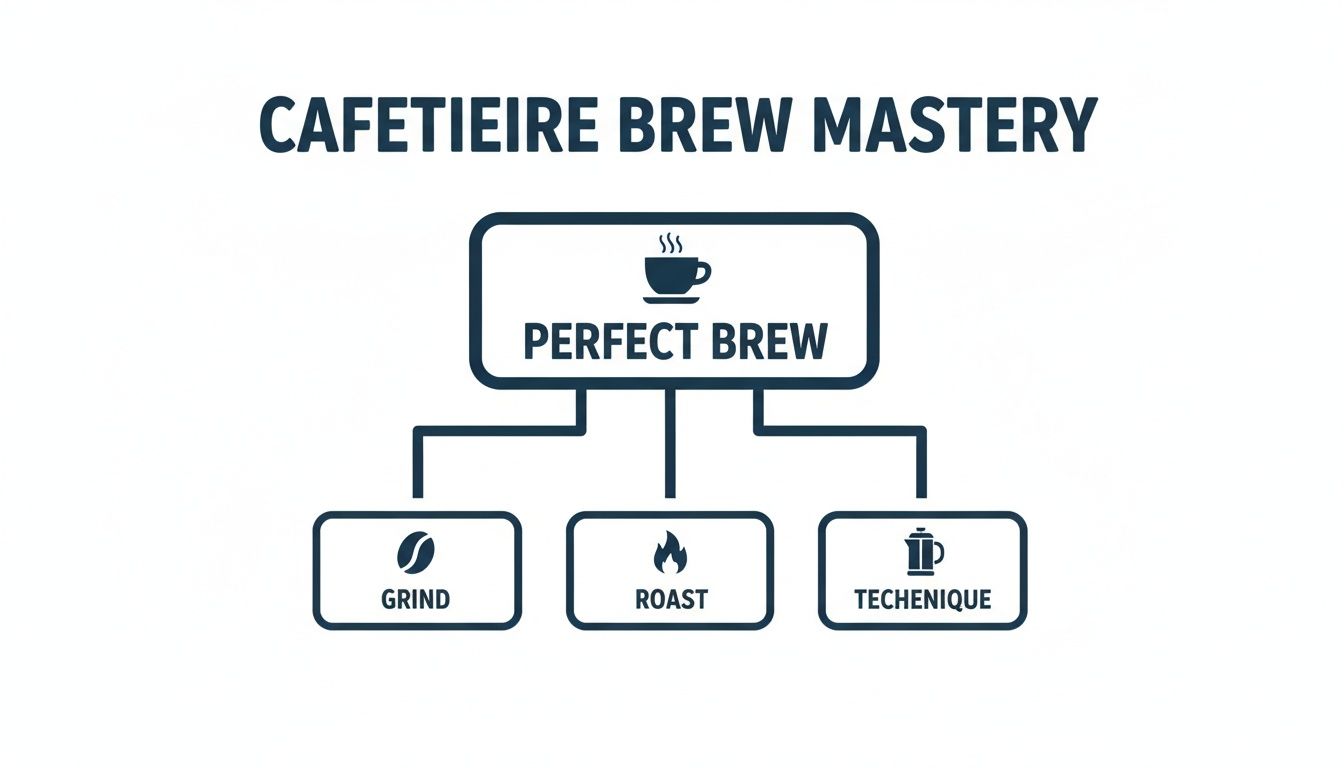
As you can see, a great cafetiere brew is a three-legged stool: grind, roast, and technique. But the grind is the leg that holds everything else up.
Trying to get this right just by looking at it can be tough, which is why so many people trust expertly prepared grounds. At ADS Coffee Supplies, our pre-ground options are perfectly calibrated for cafetiere use, taking all the guesswork out of it for a clean, delicious brew every single time. If you prefer to grind your own beans, our complete coffee grind size guide dives much deeper into getting your grinder settings just right.
"A consistent, coarse grind is the foundation of a good cafetiere brew. It's the difference between a clean, full-bodied cup and a mouthful of silt. Never underestimate its importance."
How Grind Size Affects Your Cafetiere Brew
To really see why coarse is king for the cafetiere, this table breaks down how different grind sizes directly impact the final taste and texture of your coffee.
| Grind Size | Looks Like | Result in a Cafetiere | Taste Profile |
|---|---|---|---|
| Coarse | Coarse Sea Salt | Clean, clear brew with minimal sediment. Easy to plunge. | Rich, balanced, and full-bodied. Highlights the coffee's natural sweetness. |
| Medium | Table Salt | Some sediment passes through the filter. Plunger offers slight resistance. | Can become slightly bitter due to faster extraction. Body is less clean. |
| Fine | Caster Sugar | A large amount of sediment creates a muddy cup. Difficult to plunge. | Over-extracted, resulting in a bitter, astringent, and often harsh flavour. |
| Extra Fine | Flour / Powder | Clogs the filter completely, making it nearly impossible to plunge. | Extremely bitter and undrinkable. Creates a sludgy texture. |
Ultimately, paying attention to your grind is the single biggest upgrade you can make to your cafetiere game. It guarantees proper extraction, a clean mouthfeel, and lets the true, intended flavour of the coffee shine through. It’s a simple change with a massive reward.
Choosing Your Ideal Roast and Flavour Profile
Now that we’ve sorted the perfect coarse grind, we can get to the best part of the coffee journey—exploring the incredible world of flavour. Think of the roast profile as your personal flavour map, guiding you from bright, delicate notes all the way to deep, rich, chocolatey depths. It's a lot like how a chef uses heat to transform simple ingredients; a coffee roaster uses precise temperatures to unlock the unique character hidden inside every single bean.
Understanding the difference between light, medium, and dark roasts is your first step to finding a ground coffee for your cafetiere that you'll absolutely love. Each level tells a different story about the bean's origin and the roaster's craft.
Light Roasts: Vibrant and Nuanced
Lightly roasted beans get the least amount of heat, which means they hold onto most of their original, inherent flavours. It's the closest you can get to tasting the coffee cherry itself. These roasts usually have a higher acidity—not the sour kind, but that bright, crisp quality you’d find in a green apple or a squeeze of citrus.
A light roast is probably for you if you enjoy:
- Fruity or floral notes: Think hints of berry, jasmine, or citrus.
- A delicate, tea-like body: These coffees are less about raw power and more about subtlety.
- Bright acidity: A lively, clean finish that really wakes up your palate.
If you want to try this profile, an Ethiopian Yirgacheffe is a classic choice. It often bursts with amazing notes of blueberry and bergamot.
Medium Roasts: The Balanced Favourite
Medium roasts are the real crowd-pleasers of the coffee world. They strike a beautiful balance between the bean's origin flavours and the deeper notes that develop during roasting. That bright acidity from a light roast gets toned down, and you start to taste more rounded, sweeter flavours like caramel, nuts, and milk chocolate. This is often the perfect starting point for anyone exploring ground coffee for cafetieres. Our very own ADS House Blend is a perfect example of a versatile, balanced medium roast.
These roasts are incredibly versatile, and they work brilliantly with the full-immersion brewing of a cafetiere, which really brings out their smooth body and balanced profile. It's no surprise that home brewing methods like the cafetiere are a huge driver of the UK's roasted coffee market.
Dark Roasts: Bold and Full-Bodied
Dark roasts are for anyone craving that rich, powerful, and classic coffee experience. Roasted for the longest, the beans turn a deep, dark colour and often have a noticeable oily sheen on their surface. At this stage, the original flavours of the bean are almost entirely replaced by the bold characteristics of the roast itself.
Dark roasts are all about low acidity, a heavy body, and dominant flavours of dark chocolate, toasted nuts, and maybe even a hint of smokiness. They make for a robust and comforting cup that stands up really well to a splash of milk.
A great example is a Sumatran coffee, famous for its earthy, full-bodied, and syrupy profile. Our own ADS Continental Dark Roast is a fantastic choice for those who love a deep, intense brew. If you're looking for some more guidance, we've put together an entire article on selecting the best coffee for your French press.
Ultimately, the best roast really comes down to what you enjoy. Don't be afraid to experiment with all three profiles to discover your personal favourite. By sampling different roasts and origins, you'll soon start to recognise the specific notes that make up your perfect morning cup.
A Step-by-Step Guide to Brewing Cafetiere Coffee
You’ve picked out the perfect roast and got the grind just right. Now for the fun part: mastering the brew itself. Making incredible coffee in a cafetiere isn’t about flashy gadgets or secret barista tricks; it’s all about nailing a few simple, logical steps with a bit of care. Every action, from warming the pot to that final, gentle plunge, plays a vital role in pulling out the rich, full-bodied flavour you’re after.
This guide will walk you through a foolproof method, step by step. But more importantly, we’ll explain the ‘why’ behind each move. This way, you’ll go from someone who just follows a recipe to a brewer who genuinely understands the craft. It's time to say goodbye to watery, bitter, or silty coffee for good.
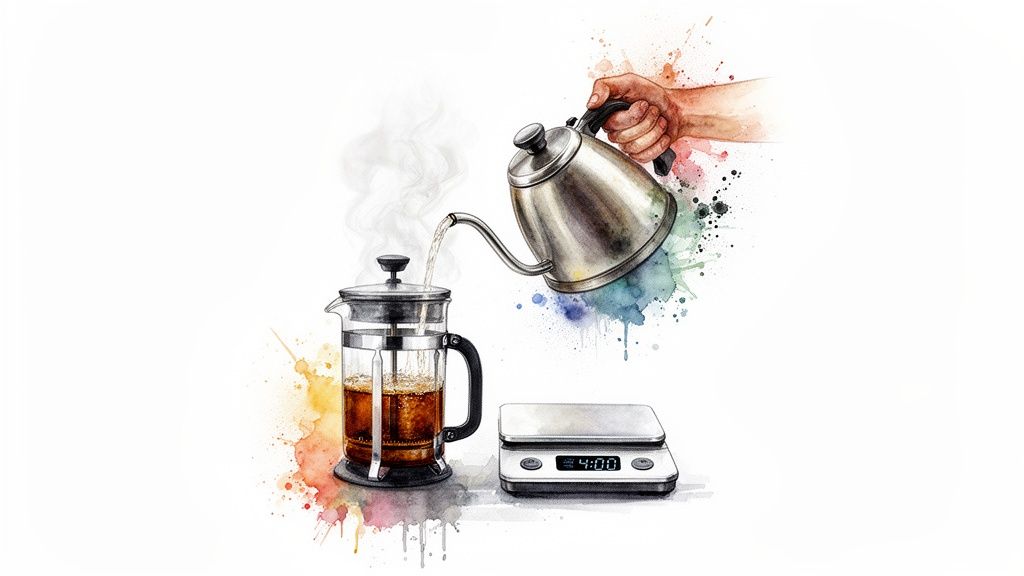
The Golden Ratio: Coffee to Water
Before we dive in, let's talk about the single most important measurement in brewing: the coffee-to-water ratio. The universally loved starting point, often called the ‘golden ratio’, is 60 grams of coffee per 1 litre of water.
Think of it like baking a cake. Too little flour and it won't hold its shape; too much and it’s dense and dry. This ratio ensures there’s enough coffee to extract all the good stuff properly, without the final brew tasting weak or becoming overwhelmingly strong.
- For Precision Brewers: Grab a digital scale. For a standard 1-litre (8-cup) cafetiere, you’ll want to weigh out 60g of coarsely ground coffee.
- For Beginners (No Scales): A pretty good estimate is one rounded tablespoon of coffee for every 200ml of water. So, for a 1-litre cafetiere, that’s about five rounded tablespoons.
Remember, this is just a starting point. Feel free to tweak it slightly until you find the exact strength that makes you happy.
The Foolproof Brewing Method
Stick to these seven steps, and you’ll be on your way to the best cafetiere coffee you've ever tasted.
1. Preheat Your Cafetiere
Just like you’d warm a plate before serving a hot meal, you need to preheat your cafetiere. Simply pour a splash of hot water from the kettle into the empty pot, give it a swirl for a few seconds, and then tip it out.
- Why it Matters: A cold glass or metal pot will instantly steal heat from your brewing water. This temperature drop leads to under-extraction, which is just a fancy way of saying your coffee will taste sour and disappointingly weak. Preheating keeps everything stable.
2. Add Your Ground Coffee
Tip your coarsely ground coffee into the bottom of your now-warm cafetiere. A gentle shake will level the grounds, creating a nice, even bed for the water.
3. Heat Your Water (But Don’t Boil It)
This is one of the most common mistakes people make. Pouring boiling water straight from the kettle will scorch your delicate coffee grounds, leaving you with a harsh, bitter taste. The sweet spot for water temperature is between 93-96°C.
To get this right without a fancy thermometer, just boil your kettle, click it off, and let it stand for about 30 to 45 seconds. That short pause is all it takes to bring the temperature down into that perfect zone for extraction.
4. Start the Bloom and Brew
Get a timer ready and set it for four minutes. Pour just enough hot water over the grounds to get them all wet (roughly twice the weight of the coffee). You’ll see the coffee bed bubble and expand—this magical moment is called the ‘bloom’, and it’s just trapped CO2 gas making a quick exit.
After 30 seconds, pour in the rest of the hot water. Use a steady, circular motion to make sure all the grounds get a good soaking. Pop the lid on top with the plunger pulled all the way up to trap the heat inside.
5. The Four-Minute Steep
Now, the hard part: wait. That four-minute steeping time is the gold standard for a reason. It’s the perfect amount of time for the hot water to extract all the delicious sugars and oils from the coarse grounds without starting to pull out the bitter compounds that cause over-extraction.
6. Break the Crust
Once your four minutes are up, you’ll see a thick ‘crust’ of coffee grounds floating on the surface. Take a spoon and gently stir it, encouraging the grounds to sink to the bottom. This little trick makes a surprising difference to the clarity of your final cup.
7. The Slow, Gentle Plunge
Finally, it’s time to press the plunger down. Go slowly and steadily. If you rush this part, you’ll churn up all the fine particles at the bottom, forcing them back up into your coffee and through the filter. A slow plunge is the secret to a clean, non-silty finish.
Once it’s plunged, pour and serve the coffee immediately. Don’t let it sit in the cafetiere, as it will keep brewing and quickly become bitter.
Troubleshooting Common Cafetiere Problems
Even when you follow every step perfectly, a brew can sometimes go wrong. But don't worry, a less-than-perfect cup isn’t a failure; it’s a brilliant learning opportunity. Understanding what went sideways is the key to making sure it never happens again. Think of this as your guide to diagnosing and fixing the most common cafetiere issues, turning brewing frustration into confidence.
We’ll break down each problem into a simple ‘Problem, Cause, Solution’ format. This practical approach ties directly back to the principles of grind, ratio, and time we've already covered, showing you exactly how to get your brew back on track.
Problem: My Coffee Tastes Weak and Watery
A watery, sour, or lifeless cup of coffee is one of the most common complaints, but thankfully, it's also one of the easiest to fix. This is a classic sign of under-extraction.
- The Cause: Under-extraction happens when the water hasn't had enough time or wasn't hot enough to pull all the lovely flavour compounds out of the coffee grounds. The usual suspects are a brew time that was too short, water that wasn't quite hot enough, or simply not using enough coffee for the amount of water.
- The Solution: First, check your watch. Are you steeping for a full four minutes? Next, make sure your water is just off the boil (around 93-96°C) before you pour. Finally, double-check your coffee-to-water ratio. If you're not using enough coffee, the brew will always taste thin. Our guide on how many tablespoons per cup of coffee can help you dial in your measurements for a much stronger result.
Problem: My Coffee Tastes Bitter and Harsh
On the other end of the spectrum is a brew that tastes unpleasantly bitter, astringent, or even burnt. This points directly to over-extraction.
Over-extraction is the coffee equivalent of leaving a teabag in your mug for ten minutes. You pull out all the good flavours at first, but then you start extracting the harsh, bitter compounds that should have been left behind.
- The Cause: This issue is almost always caused by one of two things: a grind size that is too fine, or a brew time that is too long. Fine coffee particles have a massive surface area, causing them to release their flavours far too quickly. Likewise, letting the coffee steep for much longer than four minutes will start to pull out those nasty bitter notes.
- The Solution: Look at your ground coffee first. If it looks more like table salt than coarse sea salt, your grind is too fine. The other fix is simple: stick strictly to the four-minute steep time. And remember to pour all the coffee out immediately after plunging to stop the extraction process dead in its tracks.
Problem: My Cup is Full of Grinds and Sediment
Finding a layer of sludge at the bottom of your mug is a classic cafetiere problem that ruins the lovely, clean mouthfeel you’re aiming for. This muddy texture is a dead giveaway that fine particles are sneaking through the mesh filter.
- The Cause: The number one cause is, once again, a grind size that's too fine for the cafetiere's filter. Another potential culprit is plunging too quickly or aggressively, which forces those fine particles right through the mesh instead of trapping them at the bottom.
- The Solution: The main fix is to use a coarser grind. Using the right ground coffee for cafetieres is essential and solves this problem 99% of the time. When you plunge, do it slowly, with gentle and even pressure. This prevents churning up the coffee bed and keeps the sediment where it belongs.
Your Cafetiere Coffee Questions, Answered
Even with the best guide, a few questions always seem to pop up on the path to the perfect brew. Think of this as a quick troubleshooting session where we tackle the most common head-scratchers we hear. Let’s clear up those final bits of confusion so you can get back to what matters: enjoying a truly fantastic cup of coffee.
Can I Use Espresso Ground Coffee in a Cafetiere?
In a word: no. It’s a common mistake, but one you really want to avoid. Espresso ground coffee is incredibly fine, almost like powder, because it’s designed for the intense, high-pressure extraction of an espresso machine.
If you try using that fine grind in a cafetiere, it’ll sail straight through the mesh filter. The result? A cup full of sludge and sediment. Even worse, the coffee will become severely over-extracted, leaving you with a brew that’s unpleasantly bitter and harsh. Always, always stick to a coarse grind.
How Much Ground Coffee for an 8-Cup Cafetiere?
A standard 8-cup cafetiere usually holds about 1 litre (1000ml) of water. The perfect starting point is what we in the coffee world call the 'golden ratio': 60 grams of coffee for every litre of water.
So, for a full 8-cup pot, you’ll want to use roughly 60 grams of coarsely ground coffee. This is a brilliant baseline, but don’t be afraid to tweak it slightly. If you like your coffee a bit bolder, add a few extra grams next time. Your kitchen, your rules.
The secret to a consistently great brew is just that—consistency. Using the same ratio every time means you can easily replicate that perfect cup. A small kitchen scale is probably the most valuable tool a home coffee lover can own.
Why Does My Cafetiere Coffee Taste Metallic?
That awful metallic tang can ruin an otherwise perfect morning, and it usually points to one of two culprits.
The most common reason is water that’s simply too hot. Pouring water straight from a boiling kettle will scorch the coffee grounds, creating a burnt, metallic flavour. The fix is easy: just let your kettle sit for 30-45 seconds after it clicks off. This allows the water to cool to the ideal temperature of around 93-96°C.
If your water temperature is fine, take a look at your equipment. An old or poorly cleaned cafetiere, especially a metal one, can trap stale coffee oils. Over time, these oils turn rancid and impart that nasty metallic taste. Make sure you’re giving your cafetiere a thorough clean after every single use.
Should I Pour All the Coffee Out After Plunging?
Yes, absolutely! This is a small but crucial step that many people miss. Once your four minutes are up and you’ve plunged the filter, decant all the coffee right away. Pour it straight into your mugs or into a separate serving carafe.
If you leave the brewed coffee sitting in the cafetiere on top of the grounds, it doesn’t stop brewing. The extraction continues, making the coffee more bitter and astringent with every passing minute. Pour it all out to lock in that perfect flavour you just created.
At ADS Coffee Supplies, we take the guesswork out of your daily brew by providing expertly ground coffee, ensuring you get that perfect coarse consistency for your cafetiere every time. Why not explore our single origins and blends to find your new favourite?
Discover Your Perfect Cafetiere Coffee at Seven Sisters Coffee Co.